When running queries in the CSI Authorization Auditor, the default criticality level NC (Not Classified) will be applied to the query results. You can change the rating individually in the Audit Result Screen and in the Result Container by clicking the applicable criticality level.
However, if your organization has a pre-defined ranking rating scheme, the CSI Authorization Auditor can document that information and automate the applied ranking depending on the query results and the SOX criticality of the functionality you have queried.
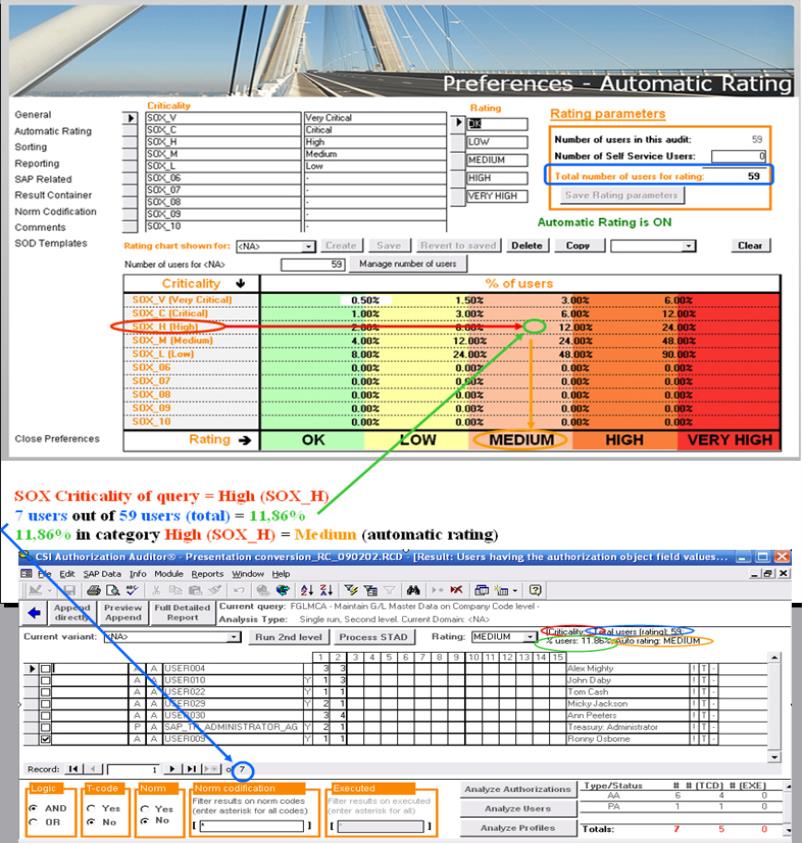
The example above illustrates this process. In this result screen, 7 users out of a total of 59 have authorization to 'Maintain G/L Master Data on Company Code level' (which is the query in this example). This query is classified as SOX High (SOX_H)-critical.
7 out of 59 users equals 11,86%. When cross-referencing this percentage in the category SOX_H it intersects at the MEDIUM category(automated rating).
Therefore the MEDIUM rating will automatically be applied in the result screen.
Note: This automated ranking can be overruled before appending it to the Result Container.
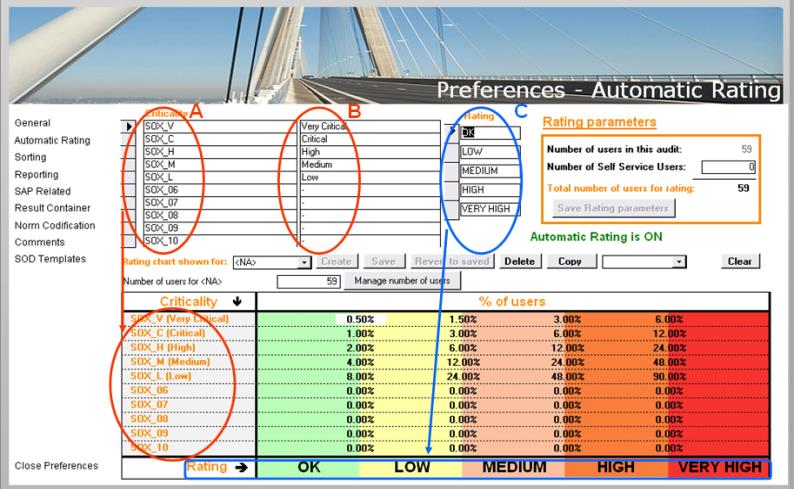
A: The criticality-type: Is an editable field which allows you to define levels of criticality. A criticality-level will be applied to each query in the Authorization Auditor in order to identify the importance/danger-factor for each individual query.
B: Whereas the criticality-type is the 'technical' property which is assigned to a query and is one of the fundamentals of the 'Automatic Rating'-chart, these text-fields are more informative-oriented, allowing you to define a somewhat more comprehensible tag to each criticality-level.
C: The rating is the indication which will be applied to each 'query-result'.
For example: for a query which has a SOX_High criticality-level, a percentage of users who have the Authorizations to execute this functionality which lies between 2% and 6%, the rating will be LOW.
If you would rather change the naming 'LOW' to something else, this is possible by changing the Rating-fields in the area C.
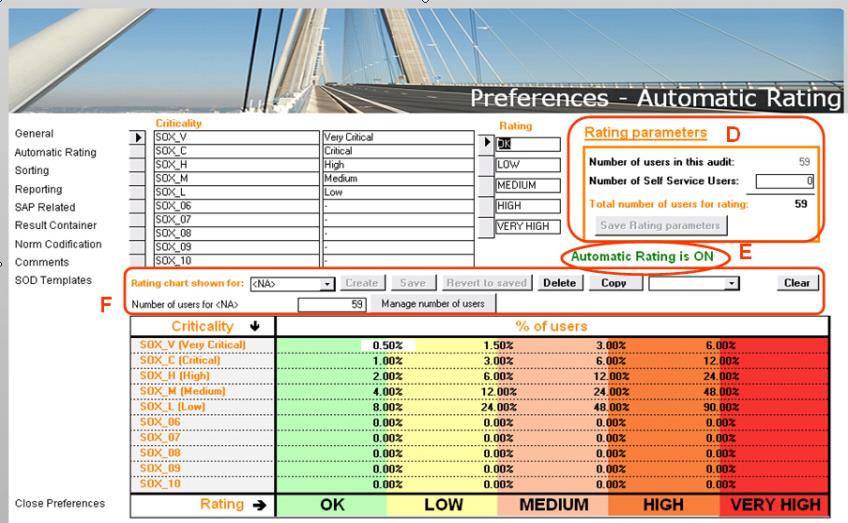
D: 'Number of users in this audit' = the Authorization Auditor will automatically provide this number based on the number of users who are taken into account during 'Data Preparation'-phase and is therefore not editable.
Note: The number of users in this audit indicates how many users are counted in the download from your SAP system. Therefor, it is a 'grand total' which incorporates all variants.
'Number of Self Service Users' = a field which by default will be set to 0, but should be altered manually. The goal of this option is to indicate the number of Self Service Users which exist in the system, in order to allow the application to 'not-take them into account' when calculating the percentages used for the Rating.
Note: A Self Service User is a userid who has some (but very limited) rights in the SAP system (for example the ability to manage his/her time-sheet, personals,...). These user-accounts are obviously not relevant to our Audit and should be excluded from the calculations in order to get relevant results.
Warning: Do not forget to click the 'Save Rating parameters'-button after changing the number of Self Service Users.
E: Automatic Rating: Can either be turned ON or OFF. Changes to this setting are made at the 'Preferences - General'-tab.
F: Whenever multiple variants exist in the system, it is possible to make a 'Rating-chart' for each/some variant(s).
The utter left drop-down-box allows you to select one of the variants which exist in the system.
When selecting a variant for which no chart exists, you are able to create one by clicking the 'Create'-button.
After changing (or creating) a chart, the changes can be saved by clicking the 'Save'-button.
Whenever you have made changes to a chart and wish to undo them (go to the previous state), you can simply click the 'Revert to saved'-button which will load the last-saved settings.
The 'Delete'-button is intended for deleting an entire chart.
Whenever you wish the copy the information from chart-A to chart-B, open chart-A, select chart-B in the drop-down-box next to the 'Copy'-button and click this 'Copy'-button.
Clearing the active chart can be achieved by clicking the 'Clear'-button.
'Manage number of users'-button: This functionality allows you to indicate how many users are active in a certain variant.
Note: It is important to provide this number since it will be used for calculation of the percentages () which apply to this variant.
CSI tools BVBA © 2012 - All Rights Reserved